1Password plugin 
DMNO’s 1Password plugin allows you to securely access your secrets stored in 1Password. This plugin uses their JavaScript SDK to authenticate using a service account. Additionally, for local development, you can opt-in to use your system-installed 1Password CLI and its integration with the 1Password desktop app. This plugin is compatible with any 1Password account type (personal, family, teams, business), but note that rate limits vary by account type.
Installation & setup
Install the package in the service(s) that will use config from 1Password.
npm add @dmno/1password-pluginpnpm add @dmno/1password-pluginyarn add @dmno/1password-pluginbun add @dmno/1password-pluginAfter installation, you’ll need to initialize the plugin in your dmno config and add a service 1password service account token into your config schema. You can explicitly wire the plugin up to the service account token if using multiple tokens at once, or it will be injected by default. It’s ok if you have not created this service account yet - we’ll do that in the next section.
import { OnePasswordDmnoPlugin, OnePasswordTypes } from '@dmno/1password-plugin';
// token will be injected using types by defaultconst onePassSecrets = new OnePasswordDmnoPlugin('1pass');
// or you can wire up the path explicitlyconst onePassSecrets2 = new OnePasswordDmnoPlugin('1passWithExplicitPath', {  token: configPath('..', 'OP_TOKEN'),});
export default defineDmnoService({ schema: { OP_TOKEN: { extends: OnePasswordTypes.serviceAccountToken, // NOTE - the type itself is already marked as sensitive 🔐 }, },});Setup vault & service account
If you already use 1password and your secrets live in a vault that holds other important passwords and info, you should create a new vault and move your secrets to it, because the access system of 1password is based on vaults, not individual items.
-
Create a vault in your 1Password account which will be used to hold your secrets. You can create multiple vaults to segment access to different environments, services, etc. This can be done using any 1password app, the web app, or the CLI. link
-
Create a new service account and grant access to necessary vault(s). This is a special account used for machine-to-machine communication. This can only be done in the 1Password web interface. Be sure to copy the new service account token or save it in another vault. link
-
Grant vault access to users/teams (optional). Your developers may need access to at least some of your vaults, especially if using the
opcli based auth mentioned below. link -
Ensure vault service account access is enabled (optional). Each vault has a toggle to disable service account access in general. It is on by default, so you will likely not need to do anything. link
This service account token will now serve as your secret-zero - which grants access to the rest of your sensitive config stored in 1Password. It must be set locally (unless relying on cli-based auth) and in any deployed environments. It is sensitive so we must pass in the value as an override rather than storing it within the config. See Setting overrides for more details.
Desktop app / CLI integration (optional)
During local development, you may find it convenient to skip the service account tokens and instead rely on your system’s op CLI and its integration with the 1Password desktop app. This means you will be connecting to 1Password as if you were using your local 1Password desktop application, including using its biometric unlocking features.
-
Opt-in while initializing the plugin
.dmno/config.mts const onePassSecrets = new OnePasswordDmnoPlugin('1pass/dev', {token: configPath('..', 'OP_TOKEN'),fallbackToCliBasedAuth: true,});Of course you can also point to a
configPathin your schema and toggle the opt-in based on some other logic if you’d like. -
Ensure the
opCLI is installed. docs -
Enable the desktop app + CLI integration. docs
-
Run
op signinto sign in on the CLI. Ensure you are logged in to the correct account. You can runop whoamito see which account is currently connected to the CLI.
With this option enabled, if the resolved service account token is empty, we will call out to the op cli installed on your machine (it must be in your $PATH) and use the auth it provides. With the desktop app integration enabled, it will call out and may trigger biometric verification to unlock. It is secure and very convenient!
Add items to your schema
With the plugin initialized and access wired up, now we must update our config schema to connect specific config values to data stored in 1Password. DMNO supports a few different ways to reference items in 1Password:
Using a .env blob
Managing lots of individual 1Password items and connecting them to your config can be a bit tedious. So, when getting started, we recommend storing multiple items together in a .env style text blob. Using this method, we’ll have a single 1Password item that can have one text entry per service containing the .env blob and look up items by their key - similar to applying a .env.local file as overrides, except they are secured and shared via 1Password. This also makes it easier to migrate from passing around .env files.
-
Create a new item within your vault. Select
Secure Noteas the item type and be sure to give it a descriptive name (e.g.,Prod secrets). -
Create a new field in the item. Click
+ add moreand selectTextto add a new multi-line text field. Change the default label oftextto the service name you want to store secrets for (e.g.,root). You can also use the special name_defaultif you are only dealing with a single service. -
Add your secrets to the text field as if it was another
.envfile that would be loaded as overrides. For example:SOME_API_KEY=super-secret-keyANOTHER_ITEM="quotes work too"You can also come back and do this later.
-
Wire up plugin instance to the new item using its private link. While viewing the item in the 1Password app, click the 3 dots in the top right and click
Copy Private Link. As this link does not contain anything sensitive, we can use a static value as our plugin input. -
Update items in your config schema to use the
.item()value resolver for anything that will be stored in the linked 1Password item. When we resolve your config values, if a match is not found, it will result in aResolutionErrorwith helpful info about how to fix it.
Your dmno config should end up looking like this:
const onePassSecrets = new OnePasswordDmnoPlugin('1pass/prod', {  token: configPath('..', 'OP_TOKEN'),  envItemLink: 'https://start.1password.com/open/i?a=I3GUA2KU6BD3FBHA47QNBIVEV4&v=ut2dftalm3ugmxc6klavms6tfq&i=n4wmgfq77mydg5lebtroa3ykvm&h=dmnoinc.1password.com',});
export default defineDmnoService({  schema: {    OP_TOKEN: {      extends: OnePasswordTypes.serviceAccountToken,    },    SOME_API_KEY: {      sensitive: true,      value: onePassSecrets.item(),    }  },});
And your 1password item may look this:
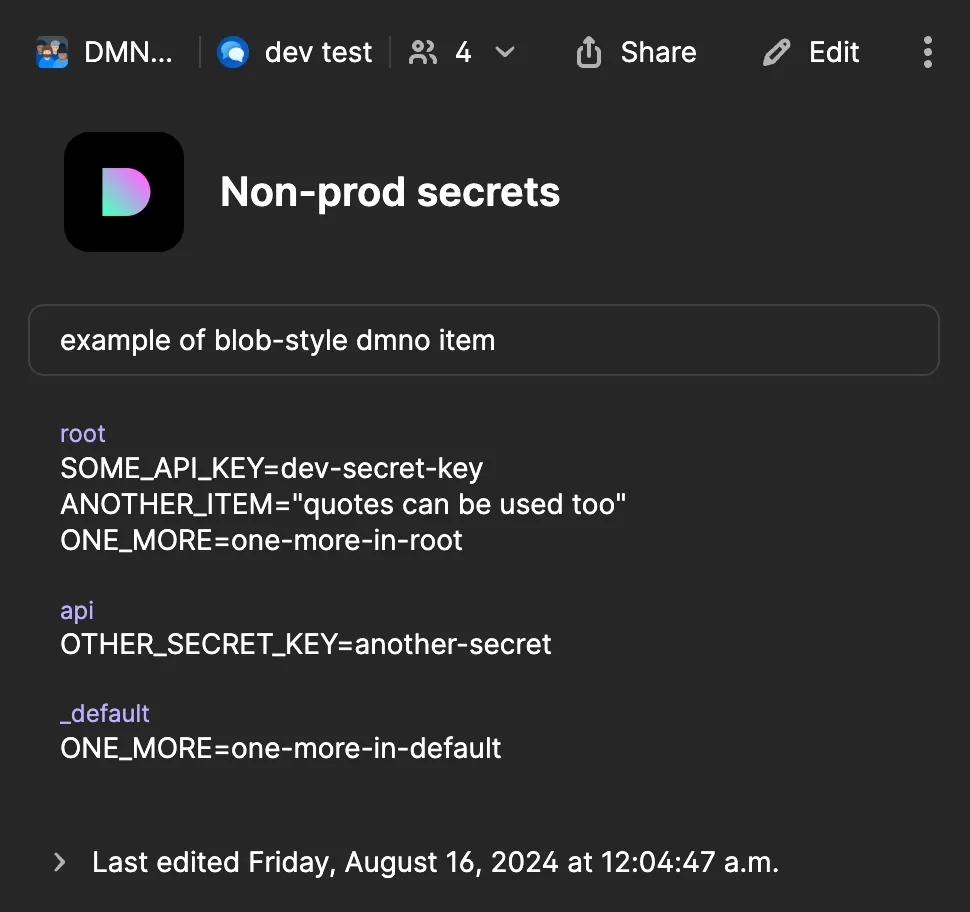
Key lookup details and example
Values are looked up within the linked 1Password item using a simple convention. We expect to find a text field within the item with a label set to the current service name. The contents of that item are parsed as a .env file, and we look up items using the config item key. If no match is found, we will also look in an additional field with the label _default.
For example, in the item above, an item with the key ONE_MORE would fallback to the value in the _default field in any service that wasn’t named root.
You can also override the key used to lookup the value in the .env blob. This can be useful if you need to save multiple values toggled by some other logic.
export default defineDmnoService({ schema: { SOME_API_SECRET: { sensitive: true, value: switchBy('APP_ENV', { // uses the default key of "SOME_API_SECRET" _default: onePassSecretsDev.item(), // uses overridden key staging: onePassSecretsDev.item('SOME_API_SECRET_STAGING'), // uses the default key but looking in a different 1pass item staging: onePassSecretsProduction.item(), }), }, },});Using specific 1Password items
If you already have lots of individual items in 1Password, or you just don’t want to use the blob method, we provide several methods to wire up individual config items to specific values in 1Password. Note that while 1Password reference URIs (e.g., op://vaultname/itemname/path) are easier to use in some ways, they are based on field labels and are not stable, so the other methods are preferred.
export default defineDmnoService({ schema: { // using item private link ITEM_WITH_LINK: { value: onePassSecrets.itemByLink( 'https://start.1password.com/open/i?a=I3GUA2KU6BD3FBHA47QNBIVEV4&v=ut2dftalm3ugmxc6klavms6tfq&i=n4wmgfq77mydg5lebtroa3ykvm&h=dmnoinc.1password.com', 'somefieldid', ), }, // using UUIDs ITEM_WITH_IDS: { value: onePassSecrets.itemById('vaultUuid', 'itemUuid', 'somefieldid'), }, // using item reference url ITEM_WITH_REFERENCE: { value: onePassSecrets.itemByReference('op://vaultname/itemname/path'), }, },});